

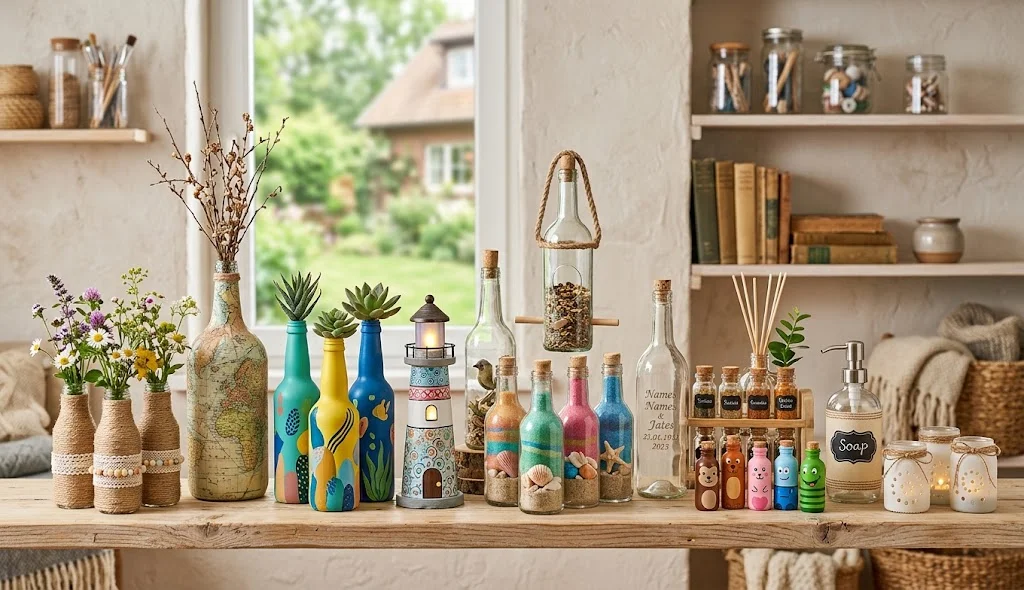
Are you looking for creative ways to reuse empty bottles? DIY crafts bottle projects are a simple and enjoyable way to turn everyday containers into handmade decorations, useful organizers, and artistic creations. Whether you have plastic bottles, glass bottles, or colorful containers, you can explore different crafting techniques to give them a new purpose.
Bottle crafts are suitable for beginners, students, craft enthusiasts, and anyone who enjoys recycling materials. With basic supplies such as paint, paper, rope, beads, and glue, you can create personalized projects without needing expensive equipment. From decorative bottle art to handmade planters and creative gift packaging, there are many ways to experiment with your ideas.
In this guide, you will discover 12 DIY bottle craft methods with materials, step-by-step instructions, and tips for making your handmade projects unique.
What Are DIY Crafts Bottle?
DIY crafts bottle are creative handmade projects that use empty bottles as a primary material. These crafts can transform recycled containers into decorations, organizers, planters, art pieces, and personalized gifts.
Plastic and glass bottles come in different shapes and sizes, which makes them useful for experimenting with creative designs. You can paint their surfaces, wrap them with decorative materials, or combine them with cardboard and other craft supplies.
Before beginning a bottle craft, select a suitable container and prepare it safely. Clean the bottle thoroughly, remove labels, and inspect it for damage. Glass bottles require extra care because they can break or have sharp edges.
12 DIY Crafts Bottle Methods
1. DIY Recycled Bottle Flower
Create colorful handmade flowers using an empty plastic bottle. This craft is a creative way to explore recycling while making decorative artwork.
Materials:
- Clean plastic bottle
- Scissors
- Acrylic paint
- Paintbrush
- Glue
- Decorative button or bead
- Craft stick
Method:
- Wash and dry the plastic bottle thoroughly.
- Carefully cut away the upper section using suitable tools.
- Shape the plastic into simple petal forms.
- Smooth or safely cover the edges as appropriate.
- Paint the petals using your favorite colors.
- Add a decorative center using a button or suitable craft material.
- Attach the flower to a craft stick or display base.
Create several flowers in different colors to form a handmade decorative arrangement. Cutting plastic should be performed by an adult or with appropriate supervision.
2. DIY Bottle Pencil Holder
Turn an empty plastic bottle into a practical pencil and stationery holder. This project can help you organize markers, pens, and other lightweight supplies.
Materials:
- Empty plastic bottle
- Scissors
- Decorative paper
- Glue
- Paint
- Ribbon or stickers
Method:
- Clean the bottle and remove its label.
- Carefully cut the bottle to create a suitable container shape.
- Ensure the cut edge is smooth and safely covered.
- Wrap the outside with decorative paper or paint.
- Add stickers, ribbon, or handmade patterns.
- Let the decoration dry completely.
- Place pencils, pens, or markers inside the holder.
Choose a bottle with a stable base to reduce the risk of tipping. This craft can be customized for school or creative workspaces.
3. DIY Bottle Lantern Decoration
Create a decorative bottle lantern using a suitable container and battery-operated LED lights. This project can add a warm decorative effect to a creative display.
Materials:
- Clean bottle suitable for decoration
- Battery-operated LED string lights
- Decorative ribbon
- Paint or glass-safe decoration materials
- Stickers
- Twine
Method:
- Select a clean bottle with enough space for the light string.
- Remove the label and dry the container.
- Decorate the outside with patterns or decorative materials.
- Allow paint or adhesive to dry fully.
- Place a suitable battery-operated LED light string inside.
- Add ribbon or twine around the neck of the bottle.
- Display the finished decoration on a stable surface.
Use battery-operated LED lights rather than open flames. Make sure the lights are suitable for the container and follow the manufacturer’s instructions.
4. DIY Bottle Planter
Reuse an empty plastic bottle to create a small planter for suitable plants. This project combines recycling with gardening and can be adapted to different plant types.
Materials:
- Clean plastic bottle
- Scissors
- Potting soil
- Small plant or seedling
- Paint
- Decorative rope
- Waterproof tray
Method:
- Clean and dry the bottle thoroughly.
- Prepare the container shape using suitable tools.
- Create drainage holes safely if needed.
- Decorate the outside with paint or decorative paper.
- Allow the decoration to dry.
- Add suitable potting soil and a small plant.
- Place the planter on a waterproof tray.
Choose a plant that suits the available light and container size. Avoid using damaged bottles or unsafe cutting techniques.
5. DIY Bottle Vase
Transform a clean bottle into a decorative vase for artificial flowers or suitable fresh flowers. You can personalize the surface with paint, twine, or creative patterns.
Materials:
- Clean bottle
- Acrylic paint suitable for the surface
- Paintbrush
- Twine or ribbon
- Glue
- Decorative flowers
Method:
- Wash and dry the bottle.
- Remove any remaining label adhesive.
- Paint the exterior in your chosen color.
- Allow the paint to dry completely.
- Wrap twine or ribbon around the neck or body.
- Add decorative patterns or simple lettering.
- Place suitable flowers inside the bottle.
If using fresh flowers and water, make sure the container is stable, watertight, and appropriate for the intended use. Handle glass bottles carefully.
6. DIY Bottle Mosaic Art
Make a creative mosaic-style bottle decoration by combining small decorative pieces or painted patterns. This project is ideal for experimenting with color and texture.
Materials:
- Clean bottle
- Decorative paper pieces or suitable craft tiles
- Craft glue
- Paint
- Small paintbrush
- Protective finish suitable for the materials
Method:
- Choose a bottle with a clean, undamaged surface.
- Plan a simple pattern using geometric shapes or color blocks.
- Paint the base layer if desired.
- Arrange decorative pieces before gluing them.
- Attach the pieces with suitable adhesive.
- Allow the craft to dry according to the glue instructions.
- Add a suitable protective finish if required.
Keep small decorative pieces securely attached, especially when the craft may be handled by children.
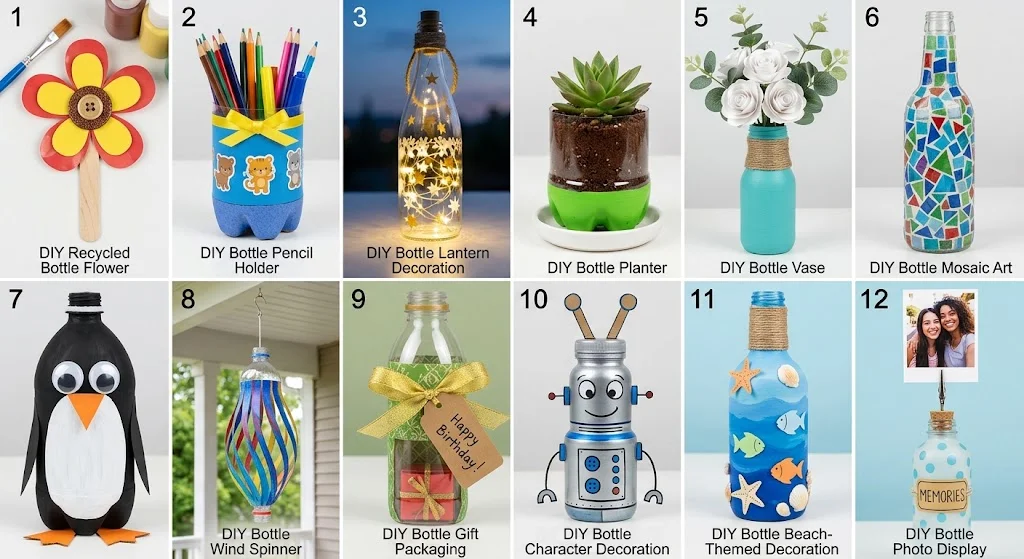
7. DIY Bottle Animal Craft
Create a playful animal-inspired craft using an empty plastic bottle. You can design a cat, penguin, fish, or original animal character with paint and cardboard details.
Materials:
- Empty plastic bottle
- Paint
- Cardboard
- Glue
- Markers
- Scissors
- Decorative paper
Method:
- Clean and dry the bottle.
- Choose an animal design.
- Paint the bottle with a base color.
- Cut ears, fins, wings, or other details from cardboard.
- Attach the details securely.
- Draw facial features using markers or paint.
- Let the finished animal craft dry before displaying it.
Create a small collection of different animal designs using bottles of various sizes.
8. DIY Bottle Wind Spinner
Make a lightweight outdoor decorative spinner using a suitable plastic bottle. This project can help you explore movement, color, and recycled craft materials.
Materials:
- Clean plastic bottle
- Suitable cutting tools
- Paint
- String
- A secure hanging attachment
- Decorative beads (optional)
Method:
- Clean and dry the bottle.
- Prepare the bottle using safe cutting techniques.
- Create suitable decorative strips or shapes.
- Paint the surface with weather-appropriate materials if needed.
- Attach a secure hanging string.
- Add lightweight decorative elements.
- Hang the spinner in a suitable location and test its stability.
Ensure that all edges are safely prepared and the finished spinner is securely attached. Avoid placing it where it could create a hazard.
9. DIY Bottle Gift Packaging
Turn a clean, suitable bottle into creative packaging for a small handmade gift. This craft focuses on decoration and presentation.
Materials:
- Clean bottle or wide-mouth container
- Decorative paper
- Ribbon
- Stickers
- Craft glue
- Gift tag
Method:
- Choose a suitable bottle or container.
- Clean and dry the surface.
- Cover the exterior with decorative paper if desired.
- Add ribbon around the neck or body.
- Attach a personalized gift tag.
- Decorate with stickers or handmade drawings.
- Place a suitable gift inside, if the container opening and material allow it.
Select packaging materials appropriate for the gift and avoid using containers that may be unsafe for food or personal-care products unless specifically designed for that purpose.
10. DIY Bottle Character Decoration
Design a bottle inspired by an original character, fantasy creature, or colorful theme. This is a creative project for people who enjoy painting and imaginative design.
Materials:
- Clean bottle
- Acrylic paint
- Paintbrushes
- Pencil
- Cardboard
- Craft glue
- Decorative markers
Method:
- Select a bottle with a shape that fits your character concept.
- Sketch a simple design on paper.
- Paint the bottle with a base color.
- Add facial features, clothing details, or patterns.
- Cut small cardboard accessories if needed.
- Attach the accessories securely.
- Allow the paint and glue to dry before displaying the craft.
Create your own character collection with different colors, themes, and expressions.
11. DIY Bottle Beach-Themed Decoration
Create an ocean-inspired bottle decoration using blue colors, paper elements, and suitable decorative materials. You can make this craft as a display piece or a creative gift.
Materials:
- Clean bottle
- Blue and white paint
- Decorative paper
- Twine
- Craft glue
- Shell-themed decorations (optional)
Method:
- Clean and dry the bottle.
- Paint the surface with ocean-inspired colors.
- Add wave patterns, seashell illustrations, or fish designs.
- Wrap twine around the bottle neck.
- Attach decorative paper shapes if desired.
- Allow the materials to dry completely.
- Display the finished craft on a stable surface.
Use clean, suitable decorative materials and avoid collecting natural items from protected environments.
12. DIY Bottle Photo Display
Create a unique photo display using a bottle, decorative paper, and a suitable photo holder. This project can be personalized for celebrations, gifts, or memory collections.
Materials:
- Clean bottle
- Printed photo
- Cardstock
- Glue
- Ribbon
- Decorative markers
- Photo holder or suitable clip
Method:
- Select a clean bottle with a stable base.
- Decorate the exterior with paint, paper, or patterns.
- Create a small cardstock label for the photo.
- Place the photo in a suitable holder or attach it to the display area.
- Add ribbon or decorative details.
- Write a short message if desired.
- Display the finished project away from moisture and direct damage.
Use copies of photographs when possible, especially if the craft will be handled frequently.
Materials You Need for DIY Crafts Bottle
You can create many bottle crafts using affordable and commonly available supplies. The materials depend on the type of bottle and the project you want to make.
Here are some useful crafting materials:
- Empty plastic bottles
- Suitable glass bottles
- Acrylic paint
- Paintbrushes
- Decorative paper
- Cardboard
- Craft glue
- Ribbon and twine
- Markers
- Beads
- Stickers
- Scissors
- Potting soil
- Battery-operated LED lights
- Decorative fabric
- Waterproof trays
Always choose supplies based on the intended use of your finished craft. Check product instructions for adhesives, paints, and other materials.
How to Prepare Bottles for DIY Crafts
Proper preparation can make your crafting process easier and safer. Follow these steps before decorating a recycled bottle:
- Empty the bottle completely.
- Wash the container with appropriate cleaning materials.
- Remove labels and adhesive residue.
- Allow the bottle to dry thoroughly.
- Inspect the bottle for cracks, damage, or sharp edges.
- Select a suitable craft design.
- Prepare your workspace and materials before starting.
Plastic bottles should be cut only with suitable tools and proper supervision. Glass bottles require special care because they can break and cause injuries.
Tips for Making Creative Bottle Crafts
Choose the Right Bottle
Different bottle shapes work better for different crafts. Wide bottles may be useful for planters, while narrow bottles can be suitable for decorative displays.
Plan Your Design
Sketch your idea or arrange your materials before applying glue or paint. This helps you experiment with the layout.
Use Matching Colors
Choose two to five colors that work well together. A coordinated palette can make your bottle craft look more polished.
Reuse Extra Materials
Paper scraps, old ribbons, cardboard, and leftover decorations can be used to personalize bottle crafts and reduce waste.
Allow Enough Drying Time
Paint and adhesive need sufficient time to dry. Follow the instructions on the products you use before handling the finished project.
Prioritize Safety
Handle scissors, cutting tools, glass containers, and adhesives carefully. Children should have adult supervision when using potentially hazardous tools.
Benefits of DIY Crafts Bottle Projects
Bottle crafts can offer several creative and practical benefits:
- Encourage recycling and material reuse.
- Provide affordable crafting activities.
- Help develop painting and design skills.
- Support creative problem-solving.
- Offer ideas for handmade gifts.
- Create personalized decorations.
- Encourage experimentation with different materials.
These projects can be adapted for different skill levels. Start with simple decorations and gradually try more advanced designs.
Creative Ways to Customize Bottle Crafts
You can give your DIY bottle projects a unique appearance by experimenting with different styles and themes.
Seasonal Designs
Create bottle decorations for birthdays, holidays, festivals, or special occasions using suitable colors and patterns.
Nature-Inspired Themes
Use floral patterns, leaves, ocean colors, or animal designs to create nature-inspired artwork.
Personalized Labels
Add names, initials, inspirational phrases, or handmade tags to create a customized decoration or gift.
Mixed-Material Crafts
Combine paint, fabric, cardboard, paper, and twine to create different textures and visual effects.
Original Character Themes
Design your own characters, symbols, and color combinations to make bottle crafts that reflect your imagination.
Conclusion
DIY crafts bottle projects are a creative way to reuse everyday containers and turn them into handmade decorations, useful organizers, planters, and artistic displays. With simple supplies and a little imagination, you can explore many different bottle craft ideas at home.
From recycled bottle flowers and pencil holders to character decorations and personalized gift packaging, each project offers an opportunity to practice crafting skills and develop your own creative style.
Choose a clean and suitable bottle, gather your supplies, and start your next DIY bottle craft. Experiment with colors, materials, and designs to create something unique that you can enjoy or share with others.