

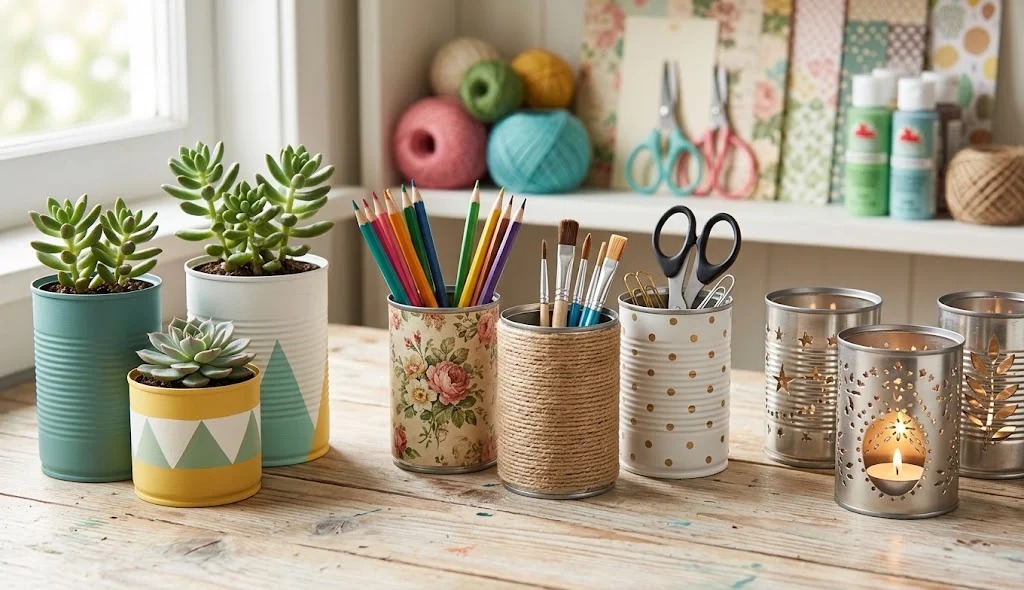
Have you ever wondered what you can make with empty cans? Instead of throwing them away, you can turn them into creative decorations, useful household accessories, and unique handmade projects. DIY crafts with cans are an affordable way to explore recycling while creating something beautiful and practical.
Empty food cans, beverage cans, and other suitable metal containers can be transformed using paint, fabric, rope, paper, and decorative materials. Whether you enjoy crafting at home, preparing a school project, or creating recycled decorations, these DIY can craft ideas offer plenty of inspiration.
In this guide, you will discover 12 creative methods for making crafts with cans, along with material suggestions, safety tips, and ideas for customizing your projects.
What Are DIY Crafts With Cans?
DIY crafts with cans are handmade projects that reuse empty cans as the main crafting material. These projects can include decorative objects, creative displays, household accessories, and recycled art.
Cans can provide a strong base for many crafts, but they must be cleaned and prepared carefully before use. Removing sharp edges and choosing the right type of container helps make your crafting experience safer.
12 DIY Crafts With Cans Methods
1. DIY Tin Can Wind Chime
Create a decorative wind chime using clean, lightweight metal cans.
Materials:
- Small clean cans
- Paint
- Strong string
- Wooden stick
- Beads
- Small bells
- Hole-punching tool suitable for metal
Method:
- Clean the cans thoroughly and remove labels.
- Ensure all edges are smooth and safe to handle.
- Decorate the cans using paint or weather-resistant materials.
- Prepare the hanging strings.
- Attach beads or small bells to the strings.
- Connect the strings to a wooden stick.
- Hang the finished wind chime in a suitable sheltered outdoor location.
Safety tip: Metal cans may have sharp edges. Use pre-smoothed craft containers or ask an adult to prepare the cans and holes.
2. DIY Can Lid Refrigerator Magnets
Turn suitable can lids into colorful decorative magnets.
Materials:
- Clean can lids with safe edges
- Decorative paper
- Glue
- Small craft magnets
- Markers
- Clear protective coating
Method:
- Choose lids that have no sharp or damaged edges.
- Measure the lid surface.
- Cut decorative paper to fit the top.
- Add drawings, patterns, initials, or small illustrations.
- Attach the paper using craft glue.
- Fix a small magnet to the back using suitable adhesive.
- Allow the project to dry before placing it on a refrigerator or magnetic board.
3. DIY Tin Can Herb Label Set
Create reusable labels for herb pots and small garden containers.
Materials:
- Clean metal can pieces or suitable metal tags
- Paint marker
- Twine
- Small wooden sticks
- Waterproof sealant
Method:
- Use prepared metal tags or safely cut pieces with smooth edges.
- Paint the surfaces with a suitable base color.
- Write herb names such as mint, basil, or rosemary.
- Add small decorative symbols.
- Allow the writing to dry.
- Attach the labels to wooden sticks using twine or suitable adhesive.
- Place the labels in plant pots.
Use materials that can withstand the intended outdoor conditions.
4. DIY Can Lid Wind Spinner
Make a colorful garden decoration using prepared can lids.
Materials:
- Smooth can lids
- Paint
- Strong wire or string
- Beads
- Decorative sealant
Method:
- Select lids with smooth, safe edges.
- Paint the lids with bright colors.
- Add dots, lines, or geometric patterns.
- Arrange the lids in a hanging design.
- Attach the lids using suitable string or wire.
- Add beads as decorative elements.
- Hang the spinner in an appropriate outdoor location.
Keep the design lightweight and securely attached.
5. DIY Tin Can Texture Art
Use cans as tools for creating textured impressions in suitable craft materials.
Materials:
- Clean can with smooth exterior
- Air-dry clay
- Rolling pin
- Craft paint
- Cardboard base
Method:
- Prepare a clean can with a smooth, safe exterior.
- Roll out a thin sheet of air-dry clay.
- Gently press the exterior texture of the can onto the clay.
- Lift the can to reveal the pattern.
- Cut the clay into decorative shapes.
- Allow the clay to dry according to its instructions.
- Paint the finished pieces and arrange them on a display board.
Test the texture on a small piece of clay before creating the final design.
6. DIY Tin Can Lantern Silhouette
Create a decorative lantern with a cutout silhouette design.
Materials:
- Clean can
- Paper template
- Marker
- Battery-operated LED light
- Paint
- Appropriate metal-working tools
Method:
- Clean and prepare the can.
- Draw or transfer a simple silhouette design.
- Have an adult create the cutouts using suitable tools.
- Smooth and inspect all edges carefully.
- Paint the outside of the can.
- Place a battery-operated LED light inside.
- Display the lantern on a stable, heat-safe surface.
Safety tip: Do not use open flames inside a homemade metal lantern. Battery-operated lighting is a safer decorative option.
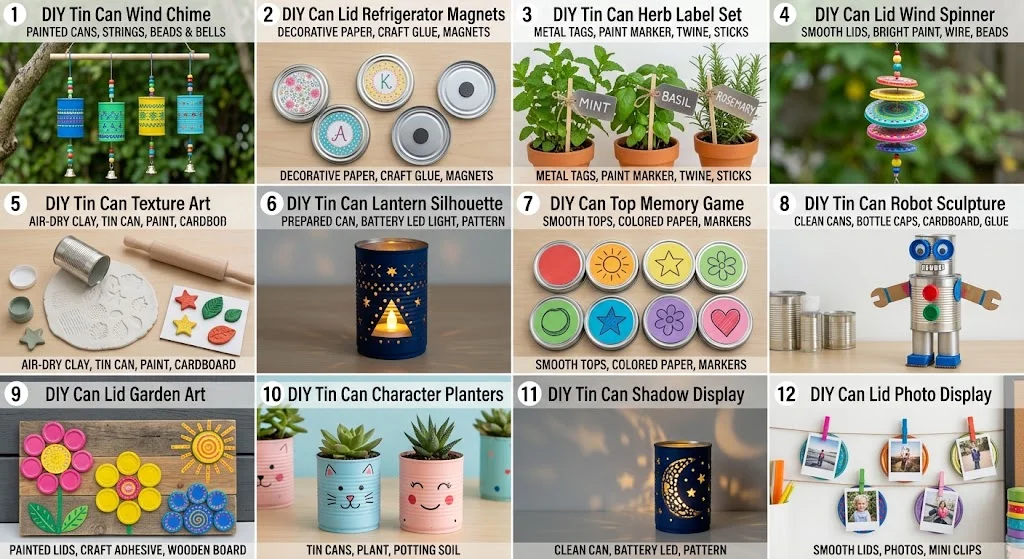
7. DIY Can Top Memory Game
Create a simple memory game using matching can tops or prepared circular pieces.
Materials:
- Smooth can tops or safe circular craft pieces
- Colored paper
- Glue
- Markers
- Storage pouch
Method:
- Prepare pairs of safe, matching circular pieces.
- Cover the surfaces with colored paper.
- Draw matching symbols on each pair.
- Create several pairs using different designs.
- Allow the glue to dry.
- Mix the pieces and place them face down.
- Turn over two pieces at a time to find matching pairs.
For children’s activities, use purpose-made craft discs instead of sharp or unfinished metal lids.
8. DIY Tin Can Robot Sculpture
Create a small robot sculpture using cans and recycled materials.
Materials:
- Clean cans
- Cardboard
- Bottle caps
- Glue suitable for the materials
- Paint
- Markers
Method:
- Choose cans of different sizes for the robot’s body and head.
- Paint the cans in your preferred colors.
- Use cardboard to create arms and feet.
- Add bottle caps for eyes or buttons.
- Attach the pieces securely using suitable adhesive.
- Add robot details with markers.
- Display the sculpture on a stable surface.
Avoid sharp metal parts and ensure small components are securely attached.
9. DIY Can Lid Garden Art
Create decorative flowers or geometric garden shapes using safe, prepared can lids.
Materials:
- Smooth can lids
- Paint
- Craft adhesive
- Wooden board
- Decorative beads
Method:
- Prepare safe, smooth-edged lids.
- Paint each lid in a different color.
- Arrange the lids into a flower, sun, or abstract pattern.
- Place the arrangement on a wooden board.
- Attach the pieces using suitable adhesive.
- Add decorative beads to the center of selected shapes.
- Display the finished artwork in a suitable location.
Keep metal decorations protected from weather if the materials are not outdoor-rated.
10. DIY Tin Can Character Planters
Transform suitable cans into playful character planters.
Materials:
- Clean cans with drainage holes prepared safely
- Paint
- Paintbrush
- Potting soil
- Small suitable plants
- Waterproof tray
Method:
- Clean the can and prepare safe drainage holes.
- Paint a character face on the exterior.
- Let the paint dry completely.
- Add soil suitable for the selected plant.
- Place a small plant inside.
- Add simple painted details such as eyes or patterns.
- Place the planter on a waterproof tray.
Choose plants according to the light and moisture conditions available.
11. DIY Tin Can Shadow Display
Create a decorative shadow display using a can and a light source.
Materials:
- Clean can
- Paper design
- Paint
- Battery-operated LED light
- Suitable metal-working tools
Method:
- Select a clean can with a stable base.
- Transfer a simple pattern to the exterior.
- Have an adult prepare small openings using appropriate tools.
- Smooth and inspect all edges.
- Paint the can if desired.
- Place a battery-operated light inside.
- Position the can so the light creates decorative patterns on a nearby surface.
Use only low-heat, battery-operated lighting and keep the display away from flammable materials.
12. DIY Can Lid Photo Display
Create a small photo display using safe, decorated metal lids.
Materials:
- Smooth can lids
- Printed photographs
- Cardstock
- Glue
- Small clips
- Decorative paint
Method:
- Select smooth, safe lids.
- Paint or decorate the lid surfaces.
- Cut cardstock backing to match the shape.
- Attach photographs to the backing.
- Fix the backing onto the decorated lids.
- Add small clips or a display stand.
- Arrange several photo pieces together for a creative memory display.
Use suitable backing and mounting materials to keep photographs protected.
Materials for DIY Crafts With Cans
You can use a variety of affordable supplies for recycled can projects:
- Clean food cans
- Suitable beverage cans
- Smooth can lids
- Acrylic paint
- Paint markers
- Craft glue
- Cardboard
- Fabric scraps
- Twine
- Beads
- Bottle caps
- Decorative paper
- Battery-operated LED lights
- Small plants
- Waterproof sealant
- Paintbrushes
Choose materials according to the specific craft and ensure that all metal components are safe to handle.
How to Prepare Cans for Crafting
Before starting a DIY can craft, follow these preparation steps:
- Empty and wash the can thoroughly.
- Remove labels and adhesive residue.
- Dry the container completely.
- Inspect the rim and surface for sharp edges.
- Use a purpose-made craft can or have an adult prepare any metal cuts.
- Select paint and adhesive that are appropriate for the intended use.
- Prepare a clean and organized workspace.
Do not use damaged cans with exposed sharp edges.
Creative Ways to Decorate Can Crafts
Paint Patterns
Use stripes, dots, geometric shapes, and hand-painted illustrations to customize your cans.
Add Fabric
Fabric scraps can give can crafts a softer appearance and help create decorative designs.
Use Recycled Accessories
Bottle caps, cardboard pieces, old buttons, and leftover craft supplies can add detail to recycled projects.
Try a Theme
You can create a garden, space, robot, ocean, or colorful geometric theme across multiple can crafts.
Combine Materials
Mix paint, twine, paper, and decorative pieces to create different textures and visual effects.
Benefits of DIY Crafts With Cans
Recycled can crafts can provide several creative benefits:
- Encourage recycling and reuse.
- Help reduce craft material waste.
- Offer affordable project options.
- Develop creative problem-solving skills.
- Provide opportunities to experiment with colors and textures.
- Create personalized decorations and art.
- Introduce beginners to mixed-material crafting.
DIY Crafts With Cans for Different Occasions
For Home Decoration
Can lid artwork, character sculptures, and decorative lanterns can add a handmade touch to your space.
For Garden Projects
Herb labels, character planters, and outdoor decorations can be adapted for gardening areas.
For School Projects
Robot sculptures, recycled art, and memory games can be used for supervised classroom or home activities.
For Gifts
Decorated photo displays, painted art pieces, and personalized recycled creations can be prepared as handmade gifts.
Safety Tips for DIY Crafts With Cans
- Always clean cans before using them.
- Inspect all edges for sharp or damaged areas.
- Ask an adult to handle metal cutting, drilling, or punching.
- Wear appropriate protective equipment when using metal-working tools.
- Use battery-operated LED lights for can lantern projects.
- Avoid using homemade can containers for food storage unless they are specifically designed and safe for that purpose.
- Keep sharp tools and small components away from young children.
- Allow paint and glue to dry completely before using finished crafts.
Conclusion
DIY crafts with cans are a creative way to reuse everyday materials and turn them into handmade decorations, sculptures, garden accessories, and fun activities. From tin can wind chimes and character planters to can lid magnets, robot sculptures, and recycled art, there are many projects to explore.
Start with a simple can craft, prepare your materials carefully, and add your own colors, patterns, and creative ideas. By reusing suitable containers, you can create unique projects while developing your crafting skills and reducing unnecessary waste.