

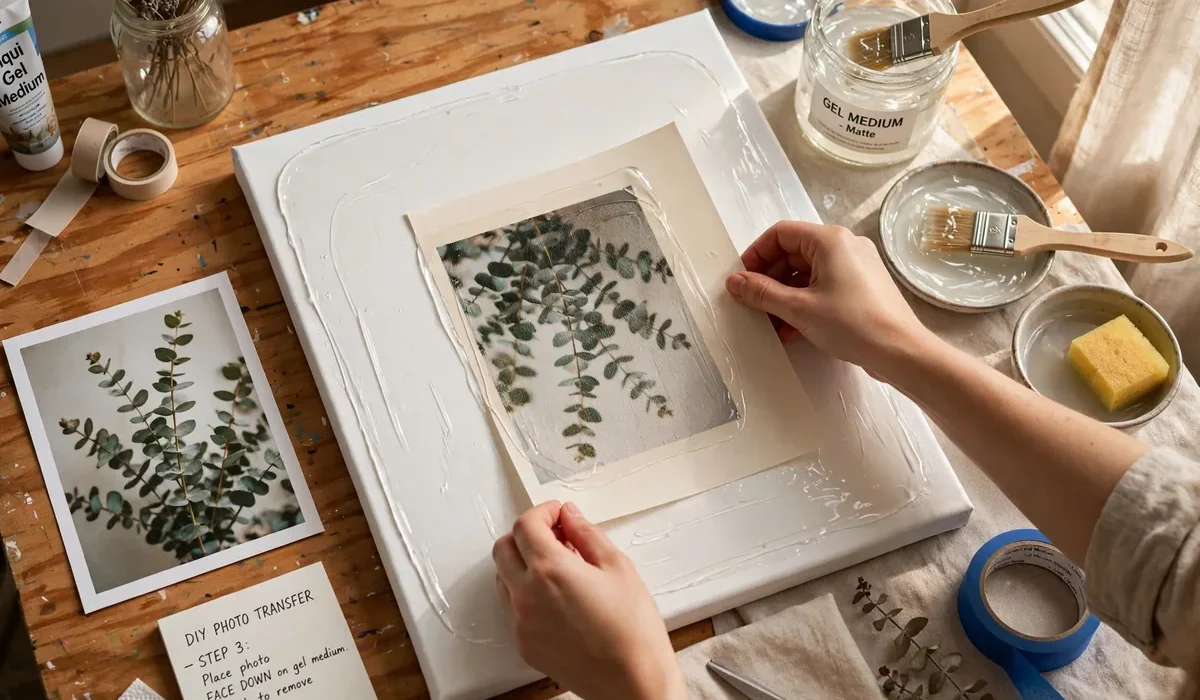
Seeing a favorite photo on canvas feels different from seeing it on a phone. A photo to canvas DIY project turns a digital memory into real wall art, without a print shop or a big budget. With a blank canvas, a printed photo, and a little patience, you can create a piece that looks thoughtful, personal, and handmade in the best way. This guide focuses on TRANSFER methods. The image itself moves from paper onto the canvas surface, rather than simply gluing a photo on top. We cover the two most popular approaches, gel medium transfer and Mod Podge transfer, plus other reliable options.
Why Transfer a Photo Onto Canvas?
A transferred photo has a soft, artistic finish that a plain print cannot match. The canvas texture shows through slightly, the edges feel organic, and the result looks more like art than a photocopy. It also makes a wonderful gift. A transferred family photo, travel memory, or pet portrait becomes something personal that no store-bought print can replace. Small imperfections add character, and you can distress the edges, add paint, or seal the piece to suit your style.
What You Need Before You Start
Pick a photo with good contrast and clear subjects. Bold images transfer better than very dark or very pale ones. Portraits, landscapes, city scenes, and pet photos all work well. Print your photo with a laser printer on regular copy paper. Inkjet prints can smear during transfer, while laser toner bonds better with gel medium. If you do not own a laser printer, most copy shops can print a laser copy for a small fee. A flat, smooth canvas panel works best for beginners because there are no staples or deep edges to fight. A stretched canvas also works and gives a more gallery-like finish. You will also need a brush or foam brush, a credit card or brayer for smoothing, water, a soft cloth, and a sealant.

Method 1: Gel Medium Photo Transfer
Gel medium transfer is the most popular method because it gives a clean, durable image with lovely texture. Brush a thick, even layer of gel medium onto the canvas, then another layer onto the printed side of your photo. Work quickly, and make sure the coverage is complete with no dry spots. Lay the photo face down onto the canvas, printed side touching the gel. Smooth it from the center outward with a credit card to push out air bubbles and wrinkles. Wipe away gel that squeezes out at the edges, then let the piece dry completely, ideally overnight. Dampen the paper with water using a sponge or spray bottle. Wait a minute, then gently rub the paper away with your fingertips in small circles. The paper will pill and roll off, leaving the image behind. Rinse, let it dry, and repeat if a hazy paper layer remains. Use light pressure so you do not rub away the image. Finally, brush on a thin layer of gel medium or clear acrylic sealer. This deepens the colors and gives a finished look.
Method 2: Mod Podge Photo Transfer
Mod Podge offers two useful routes: a true transfer with Photo Transfer Medium, and a simpler glue-on method. For a true transfer, apply Photo Transfer Medium to the printed side of your laser photo, place it face down on the canvas, smooth out bubbles, and let it dry for 24 hours. Then wet the paper and rub it away gently, just like the gel method, and seal with a thin coat of Mod Podge or clear sealer. For a faster project, skip the rubbing step. Trim your photo, brush Mod Podge onto the canvas, lay the photo face up, smooth it down, and brush another thin coat over the top. This mounts the photo beautifully and gives a decoupage-style finish. It is perfect for beginners, kids crafts, and quick gifts.
Other Transfer Techniques and Tips
For small photos, place clear packing tape over the printed image, burnish it firmly, soak the tape in warm water, and rub the paper away. The image stays on the tape, which you can stick to canvas. You can also press a laser print face down into wet acrylic paint on canvas, let it dry, and rub the paper away for a textured, vintage look. Do not rush drying. A transfer that feels dry on top may still be damp underneath, and rubbing too early can tear the image. When you rub away paper, use light circular motions and rewet often. If a white haze remains, rub once more very gently, then seal. If the image looks faded, your gel layer was too thin or the print was too light. If bubbles appear, smooth more firmly from the center outward.
FAQ
Do I need a laser printer for photo to canvas transfer?
Yes, for true transfer methods a laser print works best. Inkjet ink can smear when wet. If you only have an inkjet printer, use the glue-on Mod Podge method, or get a laser copy at a copy shop.
How long does a photo to canvas transfer take?
Active work takes about 20 to 30 minutes. Drying takes much longer. Plan for at least 8 to 24 hours before you rub away the paper. Rushing this step is the most common reason transfers fail.
Can I use Mod Podge instead of gel medium?
Yes. Mod Podge Photo Transfer Medium works much like gel medium for true transfers. Regular Mod Podge works well for gluing a photo face up onto canvas, which is faster but gives a different finish.
Why is my transferred photo blurry or faded?
The usual causes are a light print, a thin layer of medium, or rubbing too hard. Use a bold laser print, an even generous coat of medium, dry fully, and rub gently with plenty of water.
Should I seal my photo canvas after transfer?
Yes. A thin coat of clear sealer protects the image from dust, moisture, and fading. It also deepens colors and evens out any remaining paper haze.
Final Thoughts
Photo to canvas DIY transfer looks far more difficult than it is. Start with one photo, one canvas, and the gel medium method. Take your time with drying and rubbing, seal the finished piece, and enjoy art that is truly yours. Try your first transfer this weekend, and share it with someone who will love the memory as much as you do.