

Painted Flower Pots: Easy DIY Ideas, Patterns & Gifts for Every Home
Plain terracotta pot costs very little, yet with brush and paint can become prettiest thing on windowsill, porch, or desk. Painted flower pots cheap, quick, relaxing, useful. Need only pot, paint, hour. Guide: learn how to paint terracotta pots step by step, which paints/sealers last outdoors, seven beginner friendly patterns, how to turn finished pots into thoughtful gifts.
Why Painted Flower Pots Work So Well
Terracotta warm/naturally beautiful, but shelf of identical brown pots can look flat. Coat of paint changes instantly. Lets match decor, add color to dull corner, give each plant own personality. Sage pot suits calm bedroom, while coral wakes up sunny kitchen. Painting pots forgiving. If dislike stripe, paint over it. Pot, paint, brush often cost less than one ready made decorative pot.
What You Need to Paint Flower Pots
Keep simple for first pot, then add extras as gain confidence. Terracotta pots with drainage holes, sizes you want. Acrylic craft paint, or outdoor acrylic paint for pots living outside. White acrylic paint or primer for base coat. Flat/round brushes, plus fine detail brush or paint pen. Painter’s tape, pencil, water cup, paper towels, palette. Clear sealer, spray or brush on, matte or gloss. Saucer or cork pad to protect furniture. Use outdoor acrylic for pots living outside. Regular craft acrylic works indoors, but fades faster without sealer.
How to Prepare a Terracotta Pot for Painting
Good preparation helps paint stick/last. First, wipe new pot with damp cloth to remove dust. For old pot, scrub with warm soapy water, rinse well, let dry completely. Terracotta holds moisture, so give several hours or overnight. Painting damp pot traps water under paint, causes bubbling. Next, brush thin coat of clear sealer on inside, let dry. This slows soil moisture lifting paint. Leave drainage hole clear. Finally, paint outside with one or two thin coats of white primer. White base makes colors pop, hides orange brown clay. Thin coats dry smoother than one thick coat.

7 Painted Flower Pot Ideas Beginners Love
Each pattern uses simple shapes.
1. Classic Stripes
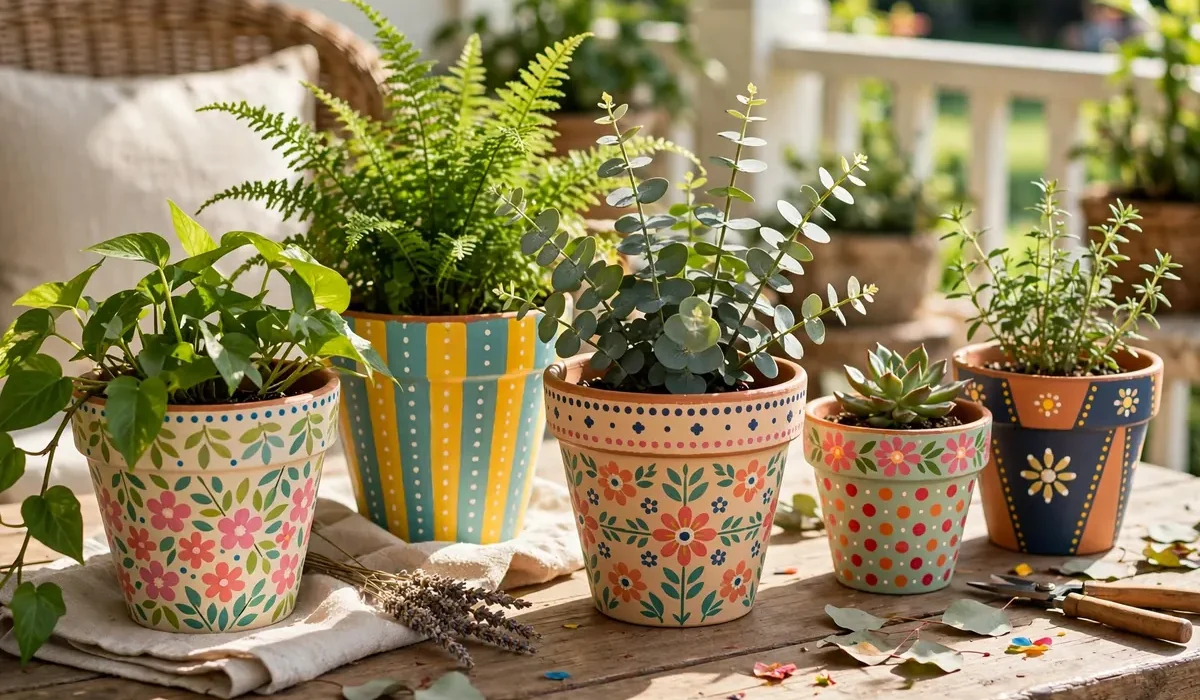
Wrap painter’s tape around pot in even bands, paint between lines, peel tape away while paint still slightly tacky. Try navy/white for coastal look.
2. Dots and Confetti
Dip pencil end or cotton swab into paint, press dots onto pot. Scatter for confetti, or arrange neat rows for polka dots. Cheerful pattern needs no freehand skill.
3. Simple Botanical Flowers
Paint small five petal flowers with round brush, add tiny yellow dot in center, green leaf or two. Simple flat flowers look modern/fresh.
4. Boho Arches and Suns
Paint warm arches in terracotta, mustard, cream, then add small sun, moon, or rainbow near top. Boho patterns pair beautifully with trailing plants like pothos.
5. Color Block
Paint bottom half one color, top half another, with thin gold or black line where meet. Color blocking bold, quick, very forgiving.
6. Faces and Characters
Give pot two dot eyes and smile, then let plant become hair. Trailing plant becomes flowing hair, spiky cactus becomes punk haircut.
7. Elegant Metallic Accents
Paint pot soft neutral like sage or dusty blue, then add metallic gold or copper rim, few thin metallic lines. Metallic accents make budget pot look like boutique find.
How to Seal Painted Flower Pots So They Last
Sealing protects design from water, sun, handling. Once paint fully dry, apply two or three thin coats of clear sealer, letting each coat dry between layers. Spray sealer gives even finish, easiest for beginners. If pot will live outdoors, choose outdoor or waterproof sealer, reapply once a year. Keep on saucer or pot feet, bring indoors during freezing weather.
Painted Flower Pots Make Wonderful Gifts
Painted pot feels personal without costing much. For housewarming, try herb pot with basil or rosemary in colors matching new kitchen. For teachers, small succulent with thank you message works beautifully. For birthdays, use person’s favorite color with cheerful flowering plant. Add handwritten care card, have complete thoughtful gift.
Common Mistakes to Avoid
Painting damp pot, which causes bubbling/peeling. Start fully dry. Skipping base coat. Light colors look patchy over bare terracotta. Using one thick coat. Thin even coats dry smoother, last longer. Forgetting sealer. Unsealed pots fade/flake outdoors. Blocking drainage hole. Keep clear so roots stay healthy.
Frequently Asked Questions
What kind of paint should I use on flower pots?
Acrylic craft paint works well indoors, outdoor or multi surface acrylic paint better outside. Always finish with clear sealer.
Do I need to prime terracotta pots before painting?
Yes. White base coat keeps colors bright, evens out porous clay, helps paint stick.
How do I keep painted pots from peeling outdoors?
Start with dry pot, use thin coats of outdoor paint, seal inside/out, reapply sealer once a year.
Are painted flower pots safe for plants?
Yes, as long as drainage hole stays clear, paint/sealer cure fully. Let pot air out for day before planting.
Start With One Pot Today
Pick one pot, one pattern, two/three colors you love. Paint it today, plant something green in it tomorrow. Which pattern will you try first? Share pots in comments, save guide for next crafting session.